Guías de configuración y escaneo de Gridinsoft Anti-Malware
Limpie su PC en 4 Minutos: Guía para Principiantes
-
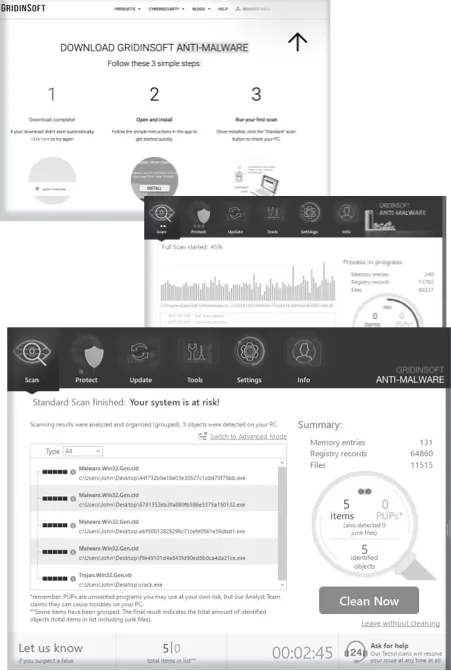
Descargar e Instalar
Visite el sitio web oficial de Gridinsoft y navegue a la sección de Descargas. Seleccione la versión compatible con su Windows (11, 10, 8 o 7). Haga clic en Descargar Ahora, luego ejecute el instalador. Siga las indicaciones en pantalla—acepte los términos, elija su directorio de instalación y finalice la configuración. Asegúrese de que su PC cumpla con los requisitos mínimos (1 GB RAM, 300 MB de espacio en disco) para un rendimiento óptimo.
-
Iniciar y Configurar
Abra Gridinsoft Anti-Malware desde el acceso directo del escritorio o el menú Inicio. En el primer inicio, revise la configuración predeterminada: la protección en tiempo real está habilitada y los horarios de escaneo están preestablecidos semanalmente. Ajuste estos en Configuración > Preferencias si es necesario (por ejemplo, excluir carpetas no críticas). Confirme sus preferencias para activar la protección básica adaptada a sus hábitos de uso.
-
Ejecutar Escaneo Rápido
Haga clic en el botón Escanear Ahora en la página de Escaneo. La herramienta realizará un barrido completo de la memoria del sistema, registro, navegadores y archivos. Una barra de progreso muestra estadísticas de detección en tiempo real, destacando amenazas como keyloggers o adware. El escaneo generalmente se completa en 3–4 minutos, dependiendo del tamaño de su unidad y velocidad del sistema.
-
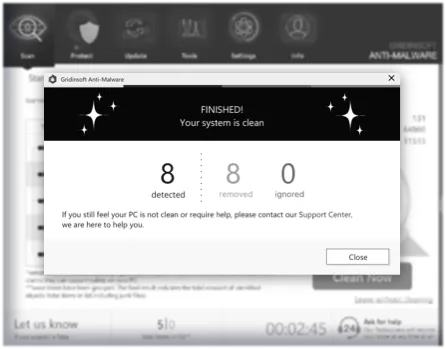
Revisar y Eliminar
Después del escaneo, un informe detallado categoriza las amenazas por nivel de riesgo (Crítico, Alto, Bajo). Seleccione Eliminar Todo para poner en cuarentena y eliminar automáticamente elementos maliciosos. Para transparencia, revise los elementos marcados en Registros de Escaneo—cada entrada incluye el nombre de la amenaza, ubicación y acción tomada. Reinicie su PC para finalizar la limpieza.
Detenga una Infección Activa en 3 Pasos
-
Iniciar en Modo SeguroSiga esta guía rápida:
Reinicie su PC y presione F8 (o Mayús + Reiniciar en Windows 10/11) para acceder a Opciones de Inicio Avanzadas. Seleccione Modo Seguro con Red para desactivar procesos no esenciales. Esto evita que el malware se inicie automáticamente, aislando la infección para una eliminación más fácil.
-
Ejecutar Escaneo RápidoEnfóquese en áreas críticas (navegadores, memoria, inicio)
En Modo Seguro, abra Gridinsoft Anti-Malware y seleccione Escaneo Rápido desde el panel. Esto se enfoca en áreas de alto riesgo: procesos en ejecución, entradas de inicio y extensiones del navegador. El escaneo identifica amenazas activas como ransomware o ladrones de datos en 60 segundos, priorizando riesgos inmediatos sobre verificaciones completas del sistema.
-
Poner en Cuarentena AmenazasAisle elementos de alto riesgo antes de eliminarlos.
Revise las amenazas detectadas y seleccione Cuarentena para aislarlas de su sistema. Los elementos en cuarentena se mueven a una carpeta segura y cifrada, evitando una mayor ejecución. Después de la eliminación, reinicie normalmente para salir del Modo Seguro y restaurar la funcionalidad completa.
Configúrelo y Olvídelo: Defensa Automatizada
-
Programar EscaneosVerificaciones automáticas diarias/semanales.
Navegue a Configuración > Escaneo Programado. Active Escaneos Programados y elija frecuencia (diaria/semanal) y hora (por ejemplo, durante el almuerzo). Los escaneos se ejecutan en silencio y los resultados se registran para revisión posterior.
-
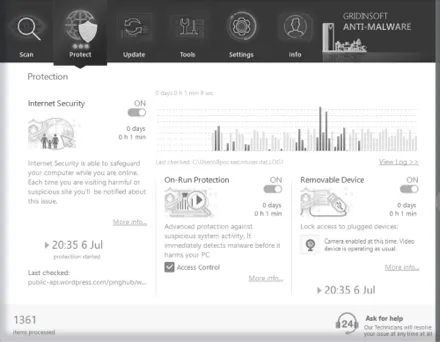
Habilitar Escudos en Tiempo RealActive el monitoreo del navegador/red.
En Protección, active Seguridad de Internet para marcar conexiones sospechosas. Active la protección Al Ejecutar para bloquear scripts maliciosos. Personalice la Lista de Ignorar a través de Herramientas para evitar interrupciones durante el trabajo.
-
Configuración de ActualizacionesHabilite descargas automáticas para bases de datos de amenazas.
Asegúrese de que Auto-Actualización esté habilitada en Configuración > Actualización. La herramienta verifica actualizaciones de la base de datos de amenazas cada hora, asegurando que las defensas se mantengan por delante de las amenazas crecientes. Las actualizaciones manuales se pueden activar en Actualización > Buscar Actualizaciones.
Adapte su Defensa: Modo Experto

-
Escaneos PersonalizadosDiríjase a carpetas/procesos específicos.
Navegue a Escanear->Escaneo Personalizado, seleccione carpetas específicas (por ejemplo, Descargas, Temp), tipos de archivo (EXE, DLL) o procesos para examinar.
-
Ajustar HeurísticaEstablezca niveles de sensibilidad para reducir falsos positivos.
En Configuración->General, modifique la sensibilidad heurística de Baja a Agresiva. Los niveles más altos detectan amenazas desconocidas pero pueden aumentar falsos positivos. Use la Lista de Ignorar para excluir archivos confiables marcados incorrectamente.
-
Exportar InformesGuarde registros para equipos de TI o auditorías.
Después del escaneo, haga clic en Herramientas->Registros de Escaneo para acceder a todos los escaneos completados. Haga clic en Guardar Como... para compartir estos con equipos de TI para auditorías o verificaciones de cumplimiento. Los informes incluyen marcas de tiempo, hashes de amenazas y acciones de remediación.
Restaure su PC Después de un Ataque de Malware
-
Ejecutar Escaneo CompletoEliminar archivos residuales/entradas del registro
Después de eliminar malware, seleccione Escanear->Escaneo Completo. Esto buscará archivos residuales (datos temporales, cookies) y reparará entradas del registro dañadas por la infección. Ayuda a recuperar espacio en disco y estabilizar el rendimiento.
-
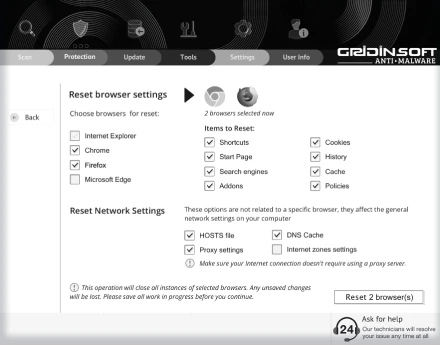
Restablecer NavegadoresUse herramientas integradas para deshacer configuraciones secuestradas.
Use las herramientas integradas de Gridinsoft Anti-Malware para restablecer la configuración del navegador a los valores predeterminados. Esto eliminará los cambios realizados por malware: página de inicio, motor de búsqueda predeterminado y extensiones del navegador.
-
Auditar CuentasVerifique contraseñas comprometidas.
Cambie las contraseñas de cuentas comprometidas (correo electrónico, banca). Habilite la autenticación de dos factores (2FA) donde sea posible.